Mari kita buat simulasi untuk lebih mudah dalam praktek sehingga lebih mudah dipahami. Contohnya anda membuat module dengan nama "coba".
Membuat halaman di admin panel untuk konfigurasi tampilan listing produk
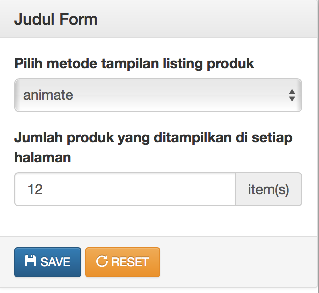
$fields = array(
  'layout' => array(
    'text'   => 'Pilih metode tampilan listing produk',
    'type'   => 'select',
    'option' => array('grid', 'listing', 'table', 'animate')
    ),
  'items' => array(
    'text'    => 'Jumlah produk yang ditampilkan di setiap halaman',
    'type'    => 'text',
    'add'     => 'item(s)',
    'checked' => 'number'
    )
  );
$config = array(
  'config' => $fields,
  'name'   => 'namaform',
  'title'  => 'Judul Form',
  'id'     => $sys->get_module_id('coba') // ini tidak digunakan tidak apa2
  );
// memanggil class bbcconfig
$obj = _class('bbcconfig');
// menentukan variable untuk form
$obj->set($config);
// menampilkan form
echo $obj->>show();
Pada script di atas, penentuan terhadap $config['id'] tidak lah wajib hanya saja saya tuliskan untuk jaga2 jika file tersebut diinclude oleh file lain di luar module "coba" maka akan tetap menjadi konfigurasi untuk module coba. Hasil dari script di atas akan menjadi:
Cara menggunakan Konfigurasi di atas
Untuk menggunakan hasil konfigurasi diatas ada dua cara:- Jika digunakan pada module yang sama ("coba") maka cukup menggunakan
config('namaform') - Jika ingin digunakan di module lain selain "coba" maka anda bisa menggunakan
get_config('coba', 'namaform');
$data = config('namaform');
print_r($data);
maka output nya menjadi:
Array
(
  [layout] => animate
  [items] => 12
)
dan jika anda mebuat file:
echo config('namaform', 'layout');atau
echo get_config('coba', 'namaform', 'layout');maka akan menghasilkan:
animate
Contoh penggunaan variable $fields
Pada contoh script di atas ada variable dengan nama$fields berikut contoh penggunaan Array config yang bisa anda gunakan untuk membuat fitur konfigurasi
$fields = array(
  'inputtext' => array(
    'text'      => 'Sample Text Input',
    'tips'      => 'text to display under the input in small font-size',
    'add'       => 'additional text after the input',
    'help'      => 'popup tips to display right after the title',
    'type'      => 'text', // type of input
    'language'  => true,   // is input support multiple language, default value is false
    'attr'      => ' size="40"', // additional attribute for the input
    'default'   => 'insert default value',
    'mandatory' => 1, // is this field must be filled in (compulsory). Eg. 1 or 0
    'checked'   => 'any' // validate input eg. 'any' / 'email' / 'url' / 'phone' / 'number'
    ),
  'plain' => array(
    'text'    => 'Sample Plaintext',
    'tips'    => 'text to display under the input in small font-size',
    'add'     => 'additional text after the input',
    'help'    => 'popup tips to display right after the title',
    'type'    => 'plain',
    'default' => 'this is the text'
    ),
  'radio' => array(
    'text'      => 'Sample Radio input',
    'tips'      => 'text to display under the input in small font-size',
    'add'       => 'additional text after the input',
    'help'      => 'popup tips to display right after the title',
    'type'      => 'radio',
    'delim'     => " -- ",
    'option'    => array('yes', 'no'),
    'default'   => '0',
    'mandatory' => 1, // is this field must be filled in (compulsory). Eg. 1 or 0
    'checked'   => 'any' // validate input eg. 'any' / 'email' / 'url' / 'phone' / 'number'
    ),
  'select' => array(
    'text'      => 'Sample Select input',
    'tips'      => 'text to display under the input in small font-size',
    'add'       => 'additional text after the input',
    'help'      => 'popup tips to display right after the title',
    'type'      => 'select',
    'is_arr'    => true,     // if this is true, user has multiple selection
    'option'    => array(1 => 'yes', 0 => 'no'),
    'default'   => 'no',
    'mandatory' => 0, // is this field must be filled in (compulsory). Eg. 1 or 0
    'checked'   => 'any' // validate input eg. 'any' / 'email' / 'url' / 'phone' / 'number'
    ),
  'checkbox' => array(
    'text'      => 'Sample Checkbox input',
    'tips'      => 'text to display under the input in small font-size',
    'add'       => 'additional text after the input',
    'help'      => 'popup tips to display right after the title',
    'type'      => 'checkbox',
    'delim'     => " -- ",
    'option'    => array(1 => 'yes', 0 => 'no'), // leave it empty or unset for one checkbox and value
    'default'   => 1,
    'mandatory' => 0, // is this field must be filled in (compulsory). Eg. 1 or 0
    'checked'   => 'any' // validate input eg. 'any' / 'email' / 'url' / 'phone' / 'number'
    ),
  'checkbox2' => array(
    'text'      => 'Sample Checkbox with one option',
    'tips'      => 'text to display under the input in small font-size',
    'add'       => 'additional text after the input',
    'help'      => 'popup tips to display right after the title',
    'type'      => 'checkbox',
    'option'    => 'activate',
    'default'   => 1,
    'mandatory' => 0, // is this field must be filled in (compulsory). Eg. 1 or 0
    'checked'   => 'any' // validate input eg. 'any' / 'email' / 'url' / 'phone' / 'number'
    ),
  'textarea' => array(
    'text'      => 'Sample textarea input',
    'tips'      => 'text to display under the input in small font-size',
    'add'       => 'additional text after the input',
    'help'      => 'popup tips to display right after the title',
    'type'      => 'textarea',
    'language'  => true,       // is input support multiple language, default value is false
    'default'   => 'sfdghgfhg',// default value
    'mandatory' => 0,       // is this field must be filled in (compulsory). Eg. 1 or 0
    'format'    => 'none',    // what format you want to use eg. none | code | html
    'checked'   => 'any' // validate input eg. 'any' / 'email' / 'url' / 'phone' / 'number'
    ),
  'file'     => array(
    'text'    => 'Sample input for single file',
    'tips'    => 'text to display under the input in small font-size',
    'add'     => 'additional text after the input',
    'help'    => 'popup tips to display right after the title',
    'type'    => 'file',
    'default' => 'sfdghgfhg',
    'path'    => 'images/uploads/'
    )
  );
0 Komentar
Berikan komentar anda